Monday, July 29, 2013

Femininely Androgynous - How to Make Trending Menswear Sexy

Hugh Hefner's famous men's magazine, Playboy, is more world-widely known and recognized, than any other of its kind. Ask Playboy readers what makes the magazine's photos stand out over the web's endless supply of eye-popping, chest-clutching, uncensored nude media and the unanimity of the answers can be chalked up to the following summation: Playboy's images are more "classy" than images in other magazines. The photos emit sex, but in a "artistic", and more "beautiful" less "raunchy" way. I decided THAT is the EXACT portrayal I try to accomplish when I dress myself..."classy sexy". I've taken a cue from Hef and developed some tips to integrate into your look based on the winning element that Playboy says is vital to the classy sexy essence of every one of their photographs...the hint of a man. For example: If a model is posing in a beach scene, she might be lying on a sports logo'd towel...Or if the set is in a home kitchen, the model may be wearing a man's t-shirt or business-inspired, white, collard shirt while she's baking cookies (obviously for her man). Just as Playboy relies on a small HINT to complete and MAKE the shot, so can you to revolutionize your look.

The key to making menswear sexy and not...well, manly, is the HINT. More than a hint and you might as well be growing a beard and drinking a brewski. Here are some of the ways I found menswear can translate as classy sexy.

TIE IT IN
Add a men's tie to a simple ensemble. It's pretty amazing what adding a tie to an understated look like jeans and a tank does. I draped a light purple, paisley-printed, men's tie around my neck with dark denim skinnies, a white ribbed tank, a black blazer and heels, and I'm telling you, the reviews were unanimously favorable. Girls thought it was the best accessory idea since the bangle and guys couldn't stop untying me with their eyes. There's just something about "the hint of a man" that drives them ALL wild.


TUX IT AWAY
There are all kinds of new spins on the tuxedo. It's become a staple piece in any designer's collection that they've somehow reinvented a part of the classic tuxedo. I love a blazer with tails or a skinny tuxedo pant. Now, remember, a HINT. You're not pairing a tux blazer with tux pants...OVERKILL. But, a tuxedo pant with a simple top and heels, or a tuxedo blazer over jeans and a tank, KILLER!


Crafty Gal Tip: Turn your outdated slacks into trendy tuxedo pants with ribbon and glue!


Even those tapered leg, internship-interview pants can be added into your wardrobe rotation again with this trick. Find some ribbon that compliments the pant color and style you want to revamp. Adhere the ribbon to the sides of each pant leg with hot glue. Overlap the ribbon at the top and the bottom of each leg so the ribbon folds over the edge of the pants at the waist and the ankle and each end of the ribbon is glued to the inside of the pant (inside of the waist band and inside of the bottom of the pant leg/or cuff). Hot glued cloth washes in the washing machine just fine as long as it's in cold water but do not put in dryer.


CHAIN IT UP
The chain wallet or pocket watch is such a dignified piece of historical men's fashion that paying homage to it in your ensemble is not only sexy but interesting and a conversation starter. Since we are paying homage, we don't have to replicate the look entirely. It's not necessary that you begin to feverishly Ebay for "watch fobs". If you consider yourself creative or a fellow crafty-gal, just think of items (chain-like) you already have that you could easily attach to clothing and/or accessories.

Crafty Gal Tip: Use a chain necklace and attach it to a jacket or pants so it drapes at your waist.


There are so many ways to attach jewelry to clothing without damaging either item. I look for a button that I can clip the end of a necklace onto. Then I use a safety pin to secure the opposite end of my necklace/chain, usually to a pocket, by inserting the safety from the inside of the pocket and poke it through the outside of the pocket. Then I just "thread" the point of the safety pin through a chain link at the end of the necklace, and fastened the safety as your supposed to after poking the end back through the fabric. Attaching a necklace to the waist of pants or jeans is easy if you have beltloops to clasp the ends onto.

Crafty Gal Tip: Chain bracelets or necklaces make great shoulder jewelry.


Bracelets can be just as trending when it comes to accessorizing with chains. Chain embellishments rock an outfit when a linked bracelet is draped over the shoulder of a top or jacket. Take it one link further and drape a necklace over your shoulder attached at collar. You may need pinning from underneath to keep in place.


YOUR FEEDBACK/COMMENTS/QUESTIONS ARE ENCOURAGED AND WELCOME HERE.

Feather Peplum: No Sewing Instructions for Creating a One-of-a-Kind Fashion Accessory


When these vintage-inspired, short, over-skirts became all the rage, I immediately started thinking up how to put my personal spin on the accessory. Search Google Shopping for 'feather peplum' and find one for purchase, I dare ya! Not there right? Feathers it was! After all, one doesn't wrap up in a peplum for the ballgame. This was going to be my outfit addition for an appropo, special occasion. And so began my feather peplum creation. What do you think? Making this thing is sooooo easy peasy I almost feel a little embarrassed and "high-n-mighty" to be giving you instructions on how to glue feathers to elastic...but here goes. Please leave feedback.


Materials:


  • 1 inch or1 1/4 inch in width elastic (enough to wrap around your waist). Color doesn't matter.
  • 3 different lengths of feathers in 3 different colors/patterns - I bought my packages of feathers from Joann Fabrics and I used long white feathers that came in packs of 8 for the bottom row, fluffy black feathers for second row, and brown and white speckled feathers for the top row (shortest length). No doubt you can use whatever colors you want. They had neon purple dyed feathers!
  • Hot glue gun and glue sticks (A handmaker's best friend)
  • Newspaper or broken down cardboard box to protect table or floor from glue
  • Safety pin


The Method


Step 1: Measure Elastic to Waist

When you measure how much elastic you will need, be sure to be wearing a tank top or the type of dress/skirt you plan to put the peplum over. Wrap the elastic around your waistline and cut about 1 1/2 inch more than your waist measurement in elastic. The additional elastic will be helpful when you fastened the ends together to wear the peplum. Do not pull the elastic tight or stretch it around your waist. We are not using elastic for this project b/c it stretches. We are using elastic b/c of it's width, texture and durability. Elastic responds well to lots of hot glue! 


Step 2: Glue Longest Feathers to Elastic

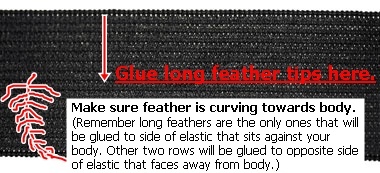
Take your longest feathers and begin hot gluing one by one to the elastic with the feather tips in the middle of the elastic strip. LEAVE a space at the end of your elastic strip before you glue the first feather. Remember you should have cut an extra 1 1/2 inch, and you need space on either end of the elastic strip to fastened them together, so glue your first feather about 3/4 inch from the end. Your longest feathers may have a long plastic tip. Mine had really long tips and I had to cut about half of it off before gluing the feathers otherwise the feathers would have been too long and the tips may have shown. You want the end of the tip to be 1/2 - 3/4 inch long and you want the end of the feather tip to lay right right in the middle of the elastic. NOTE - the long feathers are the only feathers that you will attach to the side of the elastic that will be against your body. The other two rows of feathers will be attached to the other side. Also, your feather may have a natural curve in it so when you attach it to the elastic, you want to make sure your bottom row/long feathers are concaving towards your body not away from. So, your elastic is lying flat and you will glue your longest feathers to the elastic with them curving towards you as you are looking at the project, because when you put the peplum on with the glued long feather tips touching your body, the long feathers will curve towards your body, not away from. I'm sorry to stress this like this is hot-gluing feathers for dummies but if you glue them to where they curve away from your body, you will look like you are literally trying to take flight from the hip and this fashion dare will be a total flop! It's up to you how far to space the long feathers out. The best way to get these long, fat-tipped feathers to stay in place, is to put the feather tip in the middle of the elastic and while holding it there, dowse the tip with hot glue. Be generous with the glue covering the entire tip and pointing the glue gun nozzle into the sides of the tip all while pressing the feather firmly against the elastic so there's no space between the elastic and the plastic of the feather tip. You don't have to place the long feathers side by side as you can see in my pic. This is the one row that can afford spacing and mismatched spacing at that without compromising the final look. Repeat using ample glue on each long feather. Remember to leave another space after you attach your last long feather to the elastic. Leave elastic lying flat until glue is dry. You should have used a lot of glue so dry time can be twenty minutes. You are not concerned with the fact that you can see all the glue because this side of the elastic will not be facing outward (Again...I know you're not idiots here). If at the completion of the project you are unsatisfied with the look of the INSIDE of the peplum you can use a strip of fabric to cover the elastic. I did NOT.


Crafty Gal Tip: F
eather fringe trim can be purchased by the yard (Click Below).


Step 3: Glue Mid Length Feathers to Opposite Side of Elastic

Once your glue has dried from the long feathers, turn your elastic over and start gluing your mid length feathers again with the tips at the middle of the elastic. If you purchased the fluffy feathers for your two top layers, there are no large plastic tips to deal with and you don't need to saturate them with glue. You can put a pea glob of glue on the elastic first and then place feather tip one after the other side by side or, like I did, you can take your glue gun and make a zizag line an inch or two across the elastic (not too long or glue will dry before you lay the feathers down) and then immediately start placing the feathers on the glue, quickly, and side by side. Repeat until row is finished. No need to let elastic sit to dry before moving on to next and final row of feathers.


Step 4: Glue Shortest Feathers to Elastic

Use the same technique as you did in step two except place the shortest feather tips at the very top end of the elastic so bottom of shortest feathers drape over mid length feathers. If you use enough feathers and the technique described there should be no trace of glue or feather tips at the top of the elastic. It should look very professional and clean. 


Step 5: Wear...Stop Traffic

Your feather peplum is ready to wear once glue dries. Use a safety pin to attach the two ends that have been spared of glue and feathers. You can overlap the ends and pin from underside or if you have waist room to spare, you can cut the ends shorter. I found if fastened correctly, there's no trace of pin or bare ends. You can spin the fastened part to the back of your outfit or wear it in the front like me. If the safety pin closure is too "homemade" for you, then try something else. There are tons of ways to complete this project. Hook and eye would work nicely or grab some ribbon and cut two strips to sew or glue to each elastic end. Then you can tie yourself closed in a pretty bow and this would look adorable tied in back I think.


YOUR FEEDBACK/COMMENTS/QUESTIONS ARE ENCOURAGED AND WELCOME HERE.
.

Sunday, July 28, 2013

15 New Ways to Wear a Scarf (With Image Instructions)

15 NEW WAYS TO WEAR A SCARF


Find below easy-to-follow image tutorials for some of these seemingly complicated neck fashions.

THE NOOSE

THE LOOSE NOOSE

 THE LIFE SAVER

THE NEW RIBBON

THE INCOGNITO


THE DROPPED INCOGNITO


THE CLEAN WEAVER


THE UP-TIGHT-IN-FLIGHT KNOT

THE HANG OVER


THE POMPOUS DOUBLE KNOT


THE HUNGRY LOOP